
Filing your tax return in Germany has never been this easy. Whether you’re a freelancer, self-employed, employee or retired, follow this step-by-step guide to discover how to do your German taxes online for FREE.
We’ve all heard the saying that nothing in life is certain but death and taxes. And if you live in Germany, you’re probably thinking that death-by-taxes might get you first given how incredibly difficult and expensive it seems to file your German tax return. But that’s the furthest thing from the truth.
Now we know you’ve probably heard from fellow expats that they’ve had to pay hundreds and hundreds of Euros to tax practitioners (steuerberater) to help them with their German taxes. We’ve heard the stories too! And that’s probably why you’re here.
But you see, we recently filed our own taxes as freelancers in Germany using the FREE and easy to use ELSTER platform. Besides improving our German (because the ELSTER website is only available in German), we found that it’s actually easy to do your German taxes online. Now the only certainty for us expats living in Germany is FREE and easy tax returns!
So whether you’re a freelancer, self-employed, employee or retired, simply follow this step-by-step guide to register for free on ELSTER to get started with filing your tax return in Germany. And the cool part? We’ve translated every step of the way so you don’t even need to ‘Deutsch Sprechen’ (speak German).
File Your German Taxes Online for FREE with ELSTER
So before you jump straight into how you can easily file your tax return online in Germany, you might be wondering what is ELSTER? Or as it’s officially known, Mein ELSTER (My ELSTER).
ELSTER is an online portal launched by the German tax authorities, through which tax data (tax returns, VAT returns, tax notifications, etc.) can be recorded and submitted over the internet.
Simply put, think of ELSTER as your personal online tax office. ELSTER lets you submit all your tax information (income tax return, VAT return, etc.) completely paperless and for FREE. It’s like visiting the Finanzamt from the comfort of your own computer.
Related Guide: Are you paying too much for electricity? Find out how much you should be paying and what to look out for when choosing an Electricity Provider in Germany.
When Must You File Your Tax Return in Germany?
The German tax year runs from January to December. So if you need to submit a tax return, you can submit it via the ELSTER website any time between 1 January and 31 July the following year.
This means that the last day to submit your tax return for the previous year is on 31 July of the current year.
Save Me For Later
How to Register on ELSTER to Get Started with Taxes in Germany
So now that you’ve discovered that ELSTER lets you easily file your German tax return online for FREE, simply follow this step-by-step guide to get started.
And don’t forget, ELSTER is free and available to everyone living in Germany. So you can register and use ELSTER to do taxes in Germany whether you’re a freelancer, self-employed, employee or even retired.
Step 1: Visit the ELSTER Site to Create an Account
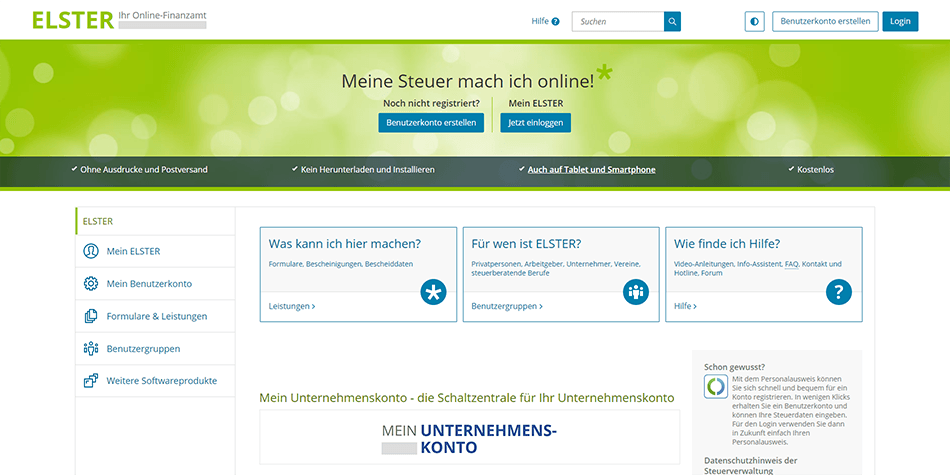
In order to file your German tax return online for free, you’ll need to create your own account on Mein ELSTER. This can easily be done by visiting the ELSTER site at elster.de.
When the page loads, simply click on the blue button titled ‘Benutzerkonto erstellen’ which means ‘Create Account’ in English. You can also access this Account Creating page on ELSTER by simply navigating to Benutzerkonto erstellen.
Remember, you follow the same step to create an account on ELSTER whether you’re a freelancer, self-employed, employee or even retired. So everyone follows the same step when registering on the ELSTER website.
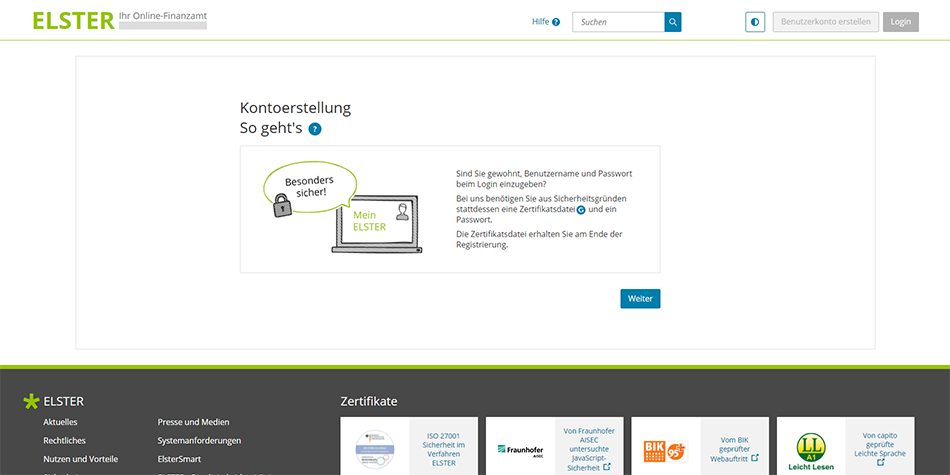
You will then be directed to a notification page entitled ‘Kontoerstellung So geht’s’ which translates to ‘Account Creation – How it Works’. The notification simply explains that in order to use the ELSTER platform to do your taxes in Germany, you need to use a ‘Zertifikatsdatei’ (Certificate File) and password instead of a username and password (which is the norm for most websites).
ELSTER utilizes a certificate file (instead of a user name) in order to enhance the security of your account. Your ELSTER ‘Zertifikatsdatei’ (Certificate File) will be available for download at the end of the account creation process. You can continue to the next page by clicking on ‘Weiter’ which means ‘Continue’ in English.
How to use a Certificate File to Sign into Mein ELSTER
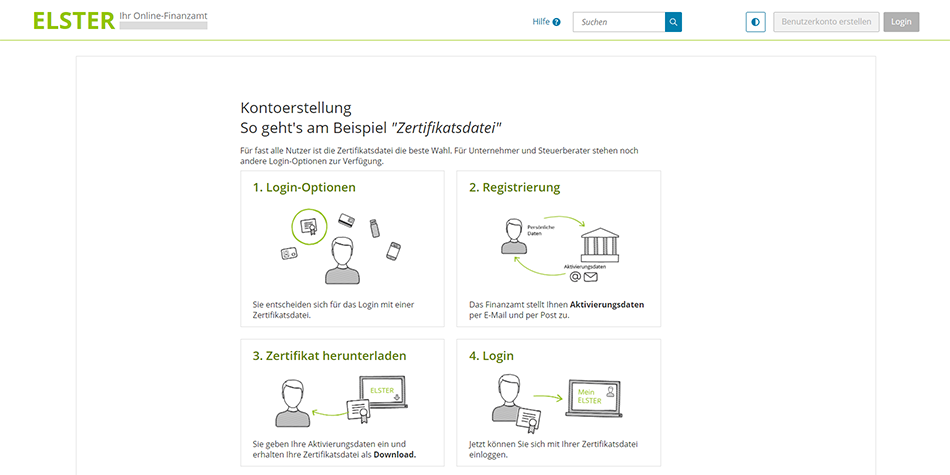
You will now be directed to a notification page entitled ‘Kontoerstellung – So geht’s am Beispiel Zertifikatsdate’ which translates to ‘Account Creation – This is how it works using the Certificate File as an Example’. The page displays 4 diagrams outlining how it works when using a ‘Zertifikatsdatei’ (Certificate File) to sign into your ELSTER account.
The diagrams simply explain that if you choose the option to login into Mein ELSTER using a ‘Zertifikatsdatei’ (Certificate File), the tax office will first send you the activation data by email and post. This activation data will be required to complete the account creation process and also to download your ‘Zertifikatsdatei’ (Certificate File). Then you will be able to log into Mein ELSTER to file your German tax return.
You can continue to the next page by clicking on ‘Weiter’ (Continue).
Step 2: Select the Login Option that Lets You Use ELSTER for FREE
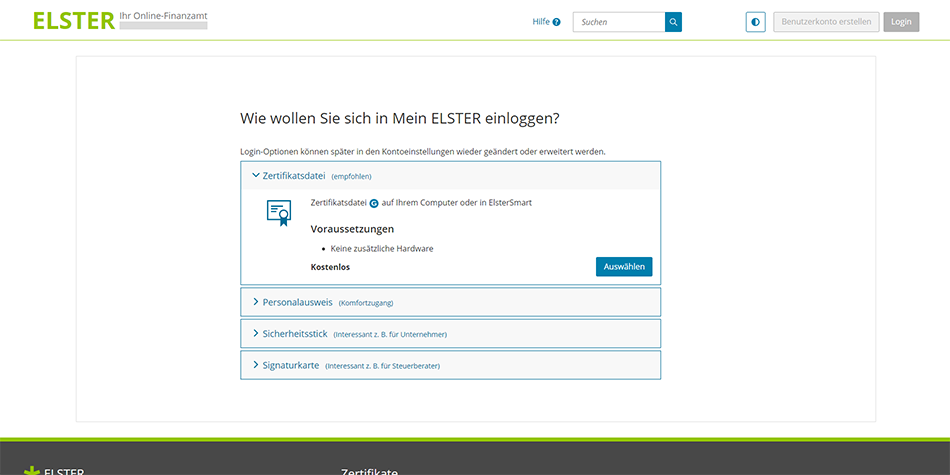
At this point, you will be directed to an Option Page requesting you to choose how you want to log into Mein ELSTER. ‘Wie wollen Sie sich in Mein ELSTER einloggen?’ translates to ‘How do you want to log into My ELSTER?’
There are several options you can choose that lets you sign into your Mein ELSTER account. The options are ‘Zertifikatsdatei’ (Certificate File), ‘Personalausweis’ (ID Card), ‘Sicherheitsstick’ (Security Stick) and ‘Signaturkarte’ (Signature Card). The only option that lets you file your German tax return without incurring any costs is the ‘Zertifikatsdatei’ (Certificate File) option.
It’s also the option that is ’empfohlen’ (German for recommended) by ELSTER. So make sure you select ‘Zertifikatsdatei’ (Certificate File) in order to do your taxes in Germany for FREE. You can continue to the next page by clicking on ‘Auswählen’ (Select).
Step 3: Choosing the ELSTER Account Type (Personal vs Organization)
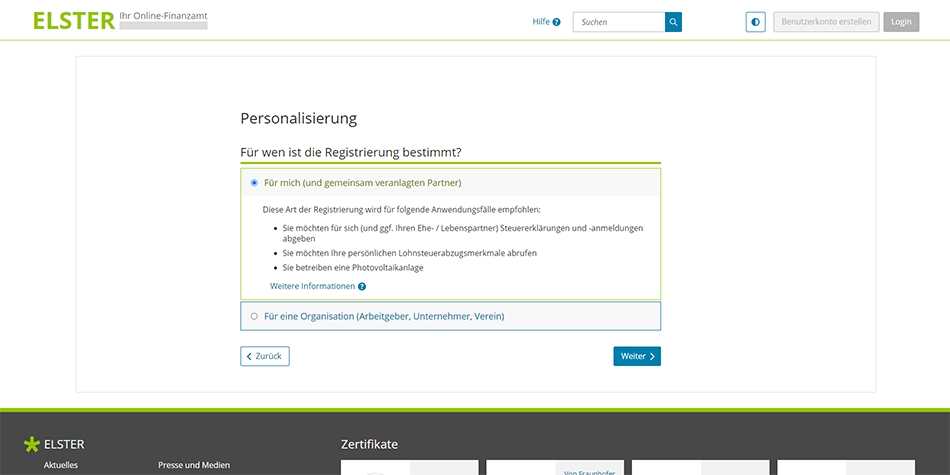
You will be directed to the ‘Personalisierung’ (Personalization) page on the ELSTER website. Here you will be requested to confirm ‘Für wen ist die Registrierung bestimmt?’ which translates to ‘Who is the registration for?’.
The options are ‘Für mich – und gemeinsam veranlagten Partner’ (For me – and jointly assessed partner) and ‘Für eine Organisation – Arbeitgeber, Unternehmer, Verein’ (For an organization – employer, entrepreneur, association).
If you select ‘Für eine Organisation – Arbeitgeber, Unternehmer, Verein’ (For an organization – employer, entrepreneur, association), you’ll need to use your company ‘Steuernummer’ (tax number) in the next step to register your account. If you select ‘Für mich – und gemeinsam veranlagten Partner’ (For me – and jointly assessed partner), you’ll need to use your 11 digit ‘Steuer Identifikationsnummer or SteuerID’ (tax identification number) in the next step.
Bonus Tip: If you’re filing your German tax return as a freelancer or you trade in your own name (sole trader), you can select either option. If you’re self-employed and you have a company registered in Germany, you should select ‘Für eine Organisation – Arbeitgeber, Unternehmer, Verein’.
To proceed to the next step, select the option that applies to you and click on ‘Weiter’ (Continue). For the purpose of simplicity, we’ve selected ‘Für mich – und gemeinsam veranlagten Partner’ (For me – and jointly assessed partner). If you select the other option, refer to the note boxes below.
When to use Steuer Identifikationsnummer (SteuerID) vs Steuernummer
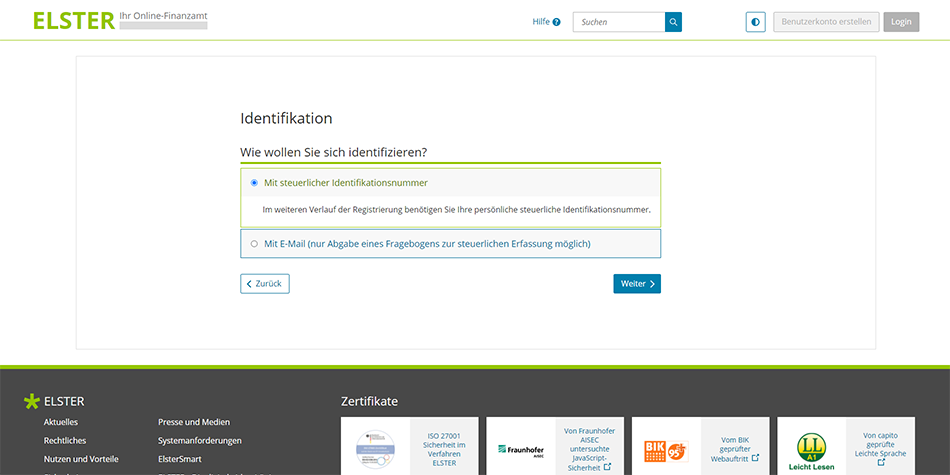
If you selected ‘Für mich – und gemeinsam veranlagten Partner’ in the previous step, you will now be directed to the ‘Identifikation’ (Identification) page on the ELSTER site. Here you will be requested to confirm ‘Wie wollen Sie sich identifizieren?’ which translates to ‘How do you want to identify yourself?’.
As mentioned before, you’ll need your Steuer Identifikationsnummer (SteuerID) in order to proceed with your registration. So if you already have it, go ahead and select the option ‘Mit steuerlicher Identifikationsnummer’ (With tax identification number).
Note for Self Employed and Entrepreneurs
If you selected ‘Für eine Organisation – Arbeitgeber, Unternehmer, Verein’ (For an organization – employer, entrepreneur, association) in the previous step, you will also be directed to the ‘Identifikation’ (Identification) page on the ELSTER site.
Here you will also be requested to confirm ‘Wie wollen Sie sich identifizieren?’ which translates to ‘How do you want to identify yourself?’. But in this case, the option will be ‘Mit Steuernummer’ (with company tax number).
If you have misplaced, lost, forgotten or you have not received your SteuerID, you can request your Steuer Identifikationsnummer from the Bundeszentralamt für Steuern. They will send it to you by post and it can take 2 to 4 weeks to arrive.
If you have not been assigned a SteuerID because you have not registered your address in Germany to get Anmeldung, you’ll need to select ‘Mit E-Mail (nur Abgabe eines Fragebogens zur steuerlichen Erfassung möglich)’ (By email – only possible to submit a questionnaire for tax registration).
Either way, we recommend that you get your SteuerID first before continuing with your registration on Mein ELSTER. You’ll eventually need it as you cannot submit your German tax return without your Steuer Identifikationsnummer.
So If you have your SteuerID handy, select ‘Mit steuerlicher Identifikationsnummer’ (With tax identification number) and click on ‘Nächste Seite’ (Next Page) to continue.
Step 4: Add Your Personal Data to Get Started on ELSTER
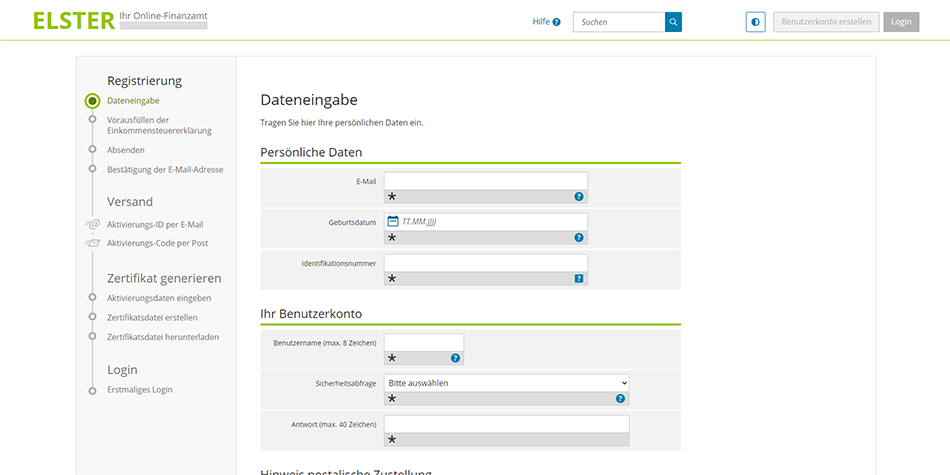
The next section will bring you to a page called ‘Dateneingabe’ which means ‘Data Entry’ in English. On this page, you’ll need to complete your personal data as well as information that you’ll use to sign into your user account on ELSTER.
Section 1: Personal Data (Persönliche Daten)
For the first section about ‘Persönliche Daten’ (Personal Data), you’ll need your email address, date of birth (geburtsdatum) and your German issued unique personal tax identification number (identifikationsnummer).
Section 2: Your User Account (Ihr Benutzerkonto)
For the second section about ‘Ihr Benutzerkonto’ (Your user account), you’ll need to create a username (benutzername) for your ELSTER account. Your ‘benutzername’ (username) must have a maximum of 8 characters.
You’ll also need to choose a ‘Sicherheitsabfrage’ (security question) from the list and create an ‘answer’ (Antwort) in order to secure your profile. Your ‘antwort’ (answer) must have a maximum of 40 characters. Below you can find the list of the security questions you need to choose from, translated from German to English.
| Sicherheitsabfrage | Security Questions |
|---|---|
| An welche Telefonnummer aus Ihrer Kindheit erinnern Sie sich? | Which phone number from your childhood do you remember? |
| Was ist Ihr Lieblingsbuch oder -film? | What’s your favorite book or movie? |
| Was ist Ihr Lieblingstier? | What is your favorite animal? |
| Was war Ihre Lieblingsfigur oder Held in der Kindheit? | What was your favorite childhood character or hero? |
| Was war Ihr Lieblingsurlaubsort während Ihrer Kindheit? | What was your favorite vacation spot during your childhood? |
| Wer ist Ihr Lieblingsschauspieler / Sänger / Künstler? | Who is your favorite actor / singer / artist? |
Section 3: Note on Postal Delivery (Hinweis postalische Zustellung)
In the third and last section about ‘Hinweis postalische Zustellung’ (Note on postal delivery), you’ll need confirm that you’ve read and understood that in order to complete the registration of your ELSTER account you will receive an activation ID (Aktivierungs-ID) by email and that an activation code (Aktivierungs-Code) will be sent to you via post.
It also explains that the letter with the activation code (Aktivierungs-Code) will be sent to the address currently on file with the relevant German authority. Simply tick the box ‘Ich bestätige, dass ich den Hinweis zur Kenntnis genommen habe’ (I confirm that I have read the notice) and click on ‘Weiter’ to continue to go to the next page.
Note for Self Employed and Entrepreneurs
If you selected ‘Für eine Organisation – Arbeitgeber, Unternehmer, Verein’ (For an organization – employer, entrepreneur, association) in step 3, there will be an additional two sections on top of the ‘Dateneingabe’ (Data Entry) page.
You’ll need to add the German organization name in the first section entitled ‘Name der Organisation/Firmenname’ (Organization Name / Company Name).
You’ll also need to add the company’s German tax number in the second section entitled ‘Steuernummer der Organisation’ (Organization tax number). And finally, ‘Persönliche Daten’ (Personal Data) will become ‘Ansprechpartner’ (Contact Person).
Step 5: Authorize ELSTER to Retrieve Your German Income Tax Certificates
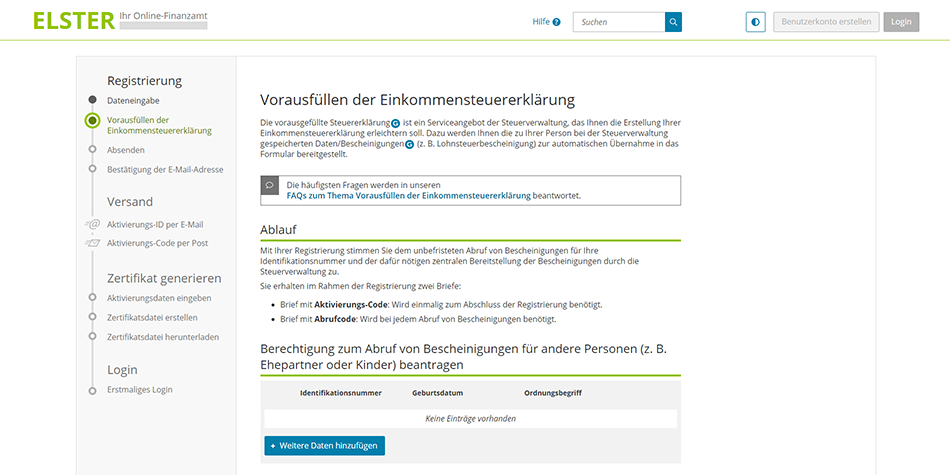
You will now be directed to the ‘Vorausfüllen der Einkommensteuererklärung’ (Pre-filling the Income Tax Return) page on the ELSTER website. This page confirms that by registering an account you are giving ELSTER authorization to retrieve your income tax certificates. It also let’s you apply for authorization to access income tax certificates for other people you intend to file a tax return for (e.g. spouse or children).
The top of the page explains that the ‘Vorausgefüllte Steuererklärung’ (Pre-filled Tax Return) is a service offered by the tax administration that is intended to make it easy for you to file your German income tax return. It also explains that ELSTER will automatically retrieve your German income tax certificates and data from the tax administration. And that this tax information will be pre-filled in your tax return which you can access via your account in order to prepare your income tax return online for free.
The ‘Ablauf’ (Procedure) section outlines how ELSTER will retrieve your German income tax certificates. It explains that you will receive two letters by post as part of the registration. One letter will contain the ‘Aktivierungs-Code’ (Activation Code) and the other will contain the ‘Abrufcode’ (Access Code). The activation code is required only once, to complete the registration. The access code is required each time certificates are called up.
The second and last section entitled ‘Berechtigung zum Abruf von Bescheinigungen für andere Personen (z. B. Ehepartner oder Kinder) beantragen’ [Apply for authorization to access certificates for other people (e.g. spouse or children)], let’s you add information about the other person/s whom you will submit tax returns on behalf of.
If you don’t need to apply for authorization to access German income tax certificates for other people, you can skip this step. To continue to the next page, click on ‘Prüfen’ (Verify).
How to Apply for Authorization to Access German Tax Certificates for Other People
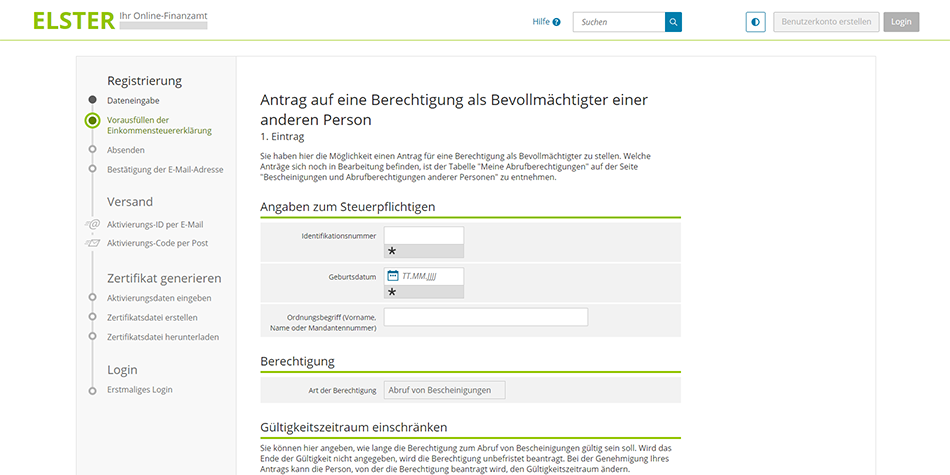
Simply click ‘Weitere Daten hinzufügen’ (Add More Data) to fill in the other person/s information. You will be directed to a new page where you need to add details about the person whom you are requesting authorization for. You’ll need to add the person’s ‘Identifikationsnummer’ (German issued unique personal tax identification number), ‘Geburtsdatum’ (Date of Birth) and ‘Ordnungsbegriff (Vorname, Name oder Mandantennummer)’ (Name, Surname).
You also need to specify the assessment period for which the retrieval of certificates should be allowed. You can select either ‘Keine Einschränkung’ (No restriction), ‘Veranlagungsjahre eingeben’ (Enter assessment years) or ‘Zeitspanne definieren’ (Define Time Span). When you’re done, click on ‘Eintrag übernehmen’ (Accept Entry) to add the person’s details and to return to the previous page.
When you’re done adding details of all the people whom you want to apply for authorization to access their German income tax certificates, simply click on ‘Eintrag übernehmen’ (Accept Entry) and then click on ‘Prüfen’ (Verify) to continue to the next page.
Note for Self Employed and Entrepreneurs
If you selected ‘Für eine Organisation – Arbeitgeber, Unternehmer, Verein’ (For an organization – employer, entrepreneur, association) in step 3, the page ‘Vorausfüllen der Einkommensteuererklärung’ (Pre-filling the Income Tax Return) instead becomes ‘Sicherheitstest (CAPTCHA)’ [Security Test (CAPTCHA)].
Simply complete the security test by entering the displayed letters or numbers in the empty field. Then click on ‘Weiter’ to continue to go to the next page.
Step 6: Check Your Data before Submitting Your Information to ELSTER
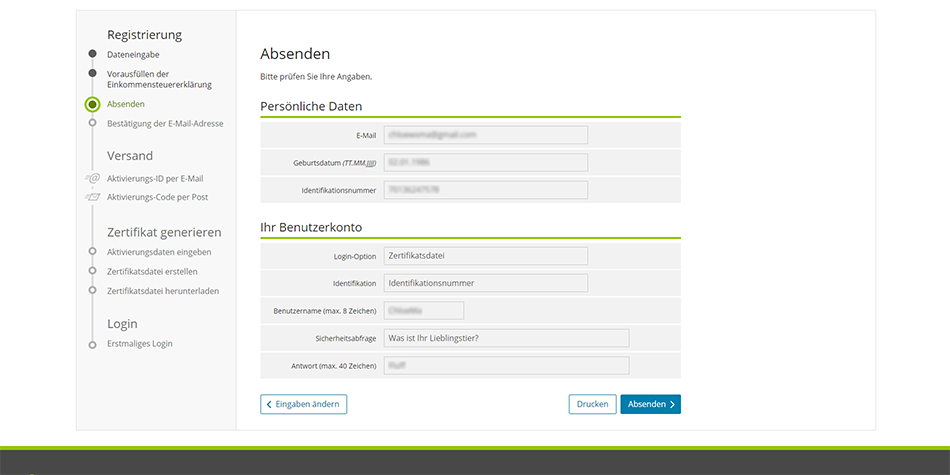
You will now be directed to the ‘Absenden’ (Submit) page where you need to check your data before you submit your information to create your Mein ELSTER account. Check that your ‘Persönliche Daten’ (Personal Data) and ‘Ihr Benutzerkonto’ (User Account) information is correct.
If you need to edit the information, simply click on ‘Eingaben ändern’ (Change entries) to go back and edit your data. If you have checked that the information is correct, click on ‘Drucken’ (Print) to save a copy in PDF and then click on ‘Absenden’ (Submit) to continue.
Note for Self Employed and Entrepreneurs
If you selected ‘Für eine Organisation – Arbeitgeber, Unternehmer, Verein’ (For an organization – employer, entrepreneur, association) in step 3, you will need to check the information in two additional sections.
Check the data in the first section entitled ‘Name der Organisation/Firmenname’ (Organization Name / Company Name). And in the second section entitled ‘Steuernummer der Organisation’ (Organization tax number). ‘Persönliche Daten’ (Personal Data) will become ‘Ansprechpartner’ (Contact Person).
Step 7: Confirm Your Email Address to Create Your Account on ELSTER
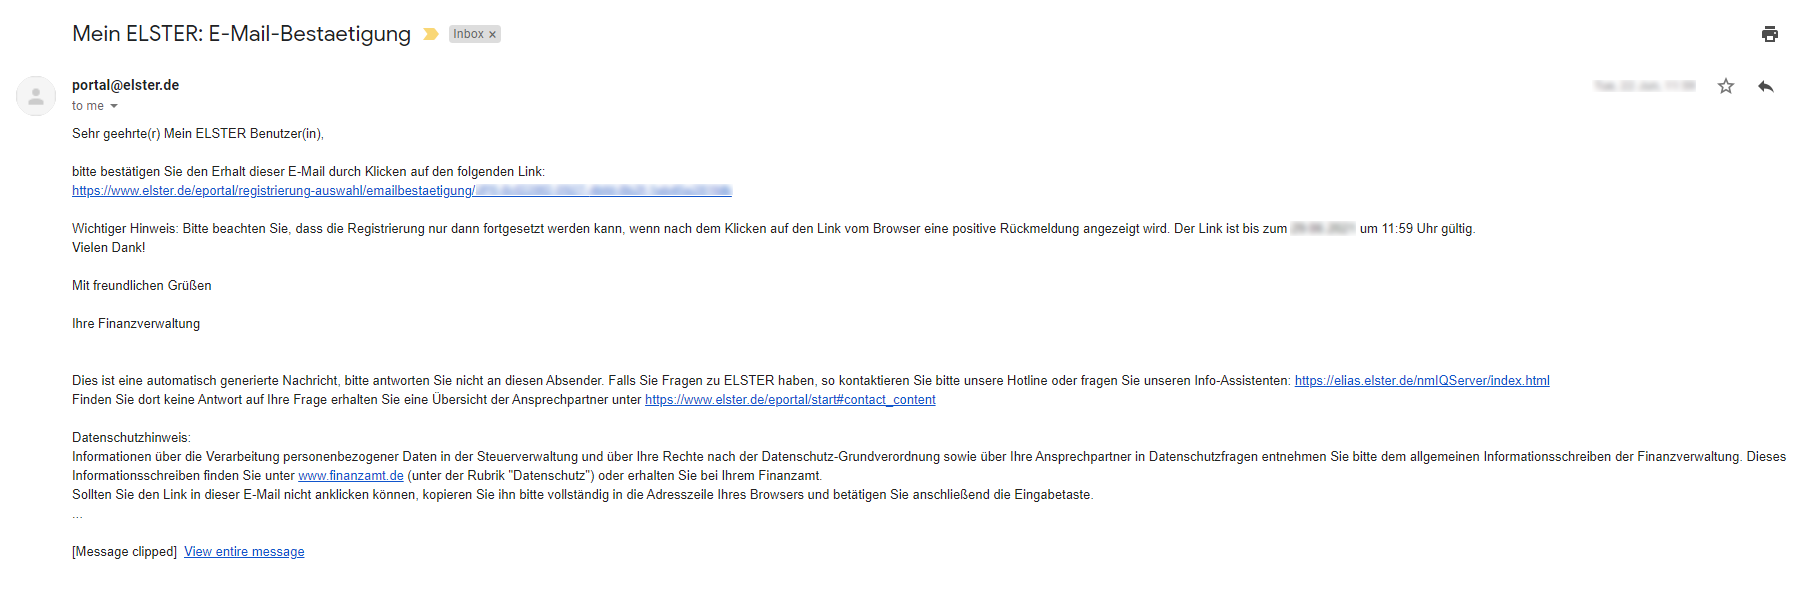
The ‘Bestätigung der E-Mail-Adresse’ (Validation of E-Mail address) page will be displayed and the notification ‘Prüfen Sie Ihr E-Mail-Postfach’ (Check Your Email Inbox) displayed. There’s also a message stating that a confirmation email has been sent to you and you need to follow the instructions on the email.
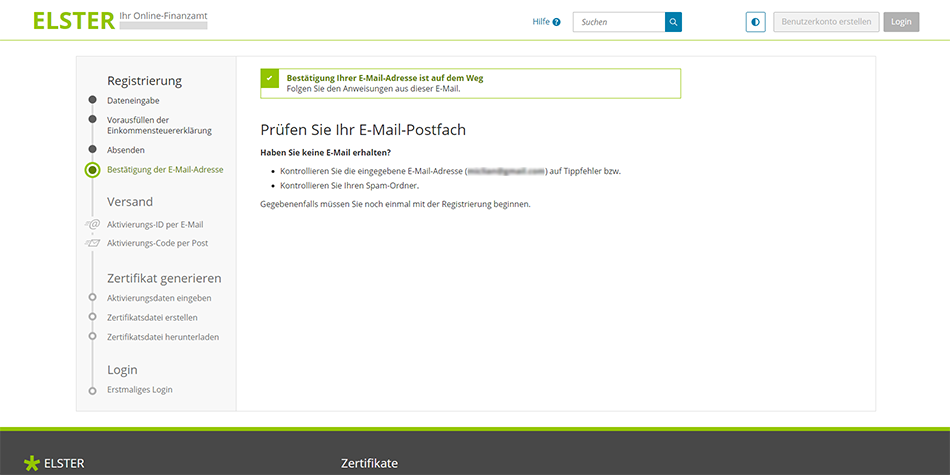
So head over to your inbox and open the confirmation email you received from ELSTER. You should receive the link immediately, but remember that it’s only valid for 7 days. All you need to do to confirm your email address to create your account on ELSTER is click on the link in the confirmation email.
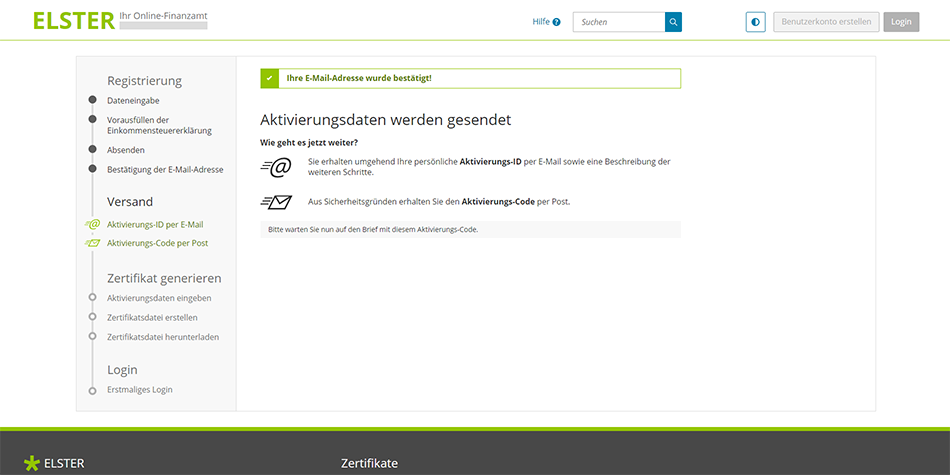
You will be directed to the ‘Versand’ (Shipping) page with the notification ‘Aktivierungsdaten werden gesendet’ (Activation Data is Sent) displayed. There’s also a notice at the top of the page stating that your email has been confirmed.
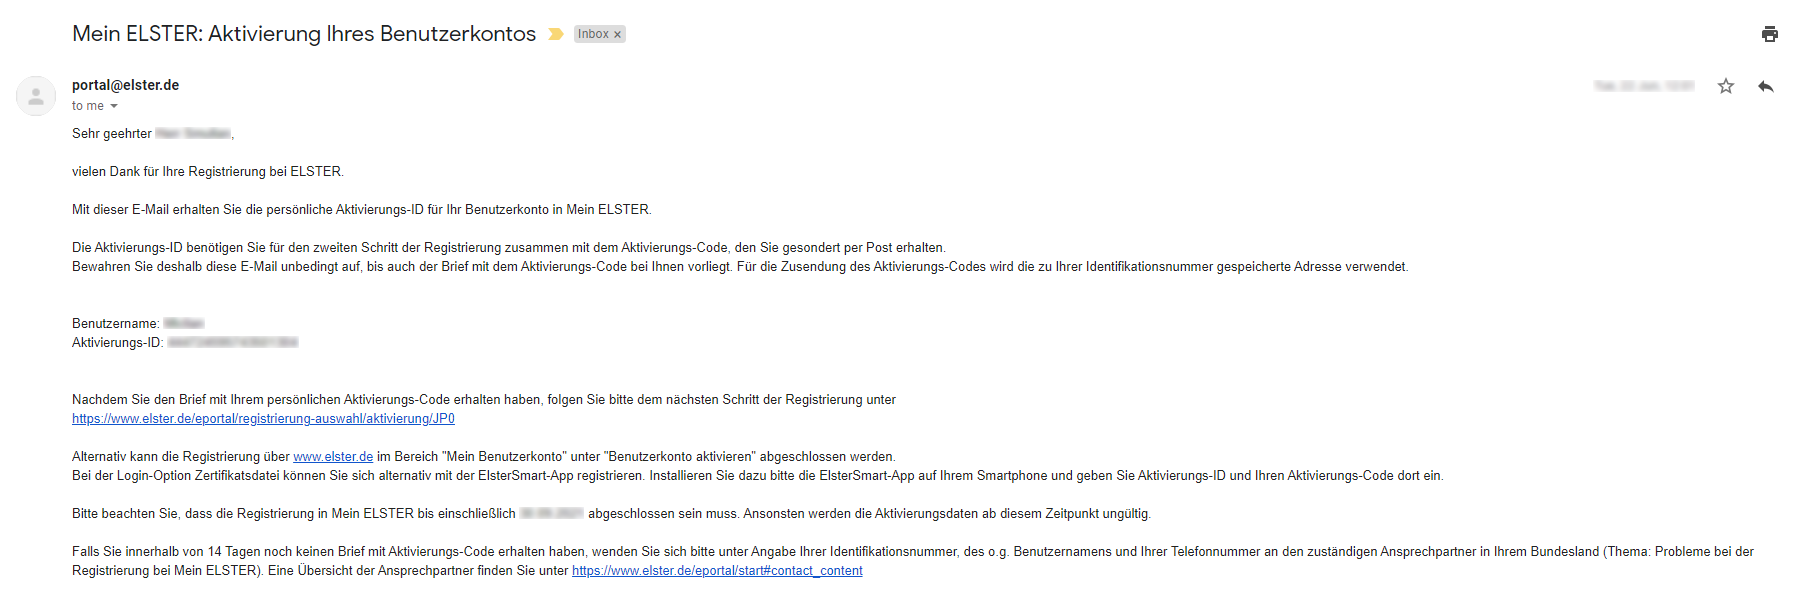
Your ELSTER ‘Aktivierungs-ID’ (Activation ID) and ‘Benutzername’ (Username)
You will also receive a second email with your ‘Aktivierungs-ID’ (Activation ID) and ‘Benutzername’ (Username). In order to complete the second step of the registration on the ELSTER website, you will need the activation ID along with the ‘Aktivierungs-Code’ (Activation Code). For security reasons, the activation code will be sent separately by post.
Bonus Tip: The ‘Aktivierungs-Code’ (Activation Code) may take up to a week to arrive in the post. So while you wait to get started with your taxes in Germany, check out these 22 free ways to learn German online.
What to do with your German tax refund?
Invest for the future. Why not! A tax refund means you’ve paid too much to the German tax authorities and they owe you money for a change. So why not use your hard earned money to invest in top companies and save for your retirement.
Luckily for you, eToro lets you invest in hundreds of companies and crypto assets commission free. That’s 0% commission and no fees when you buy stocks on eToro. Open your free eToro account today and invest from as little as $10 (€9.50).
Your capital is at risk, other fees may apply. For more information, see the eToro disclaimer.
Step 8: Use the ‘Aktivierungs-Code’ to Activate Your ELSTER Account
A few days will pass and there will be no sign of your ‘Aktivierungs-Code’ (Activation Code) in the post. Doing German taxes online and for FREE will quickly become a distance thought. But after about 1 week, you’ll check your post again. And what you’ve been yearning for to complete your ELSTER account registration will finally arrive in the post.
We received our ‘Aktivierungs-Code’ (Activation Code) in post within 1 week. Just remember that the activation code is only valid for 90 days. So make sure you complete your ELSTER account registration as soon as you receive the ‘Aktivierungs-Code’ (Activation Code) in the post.
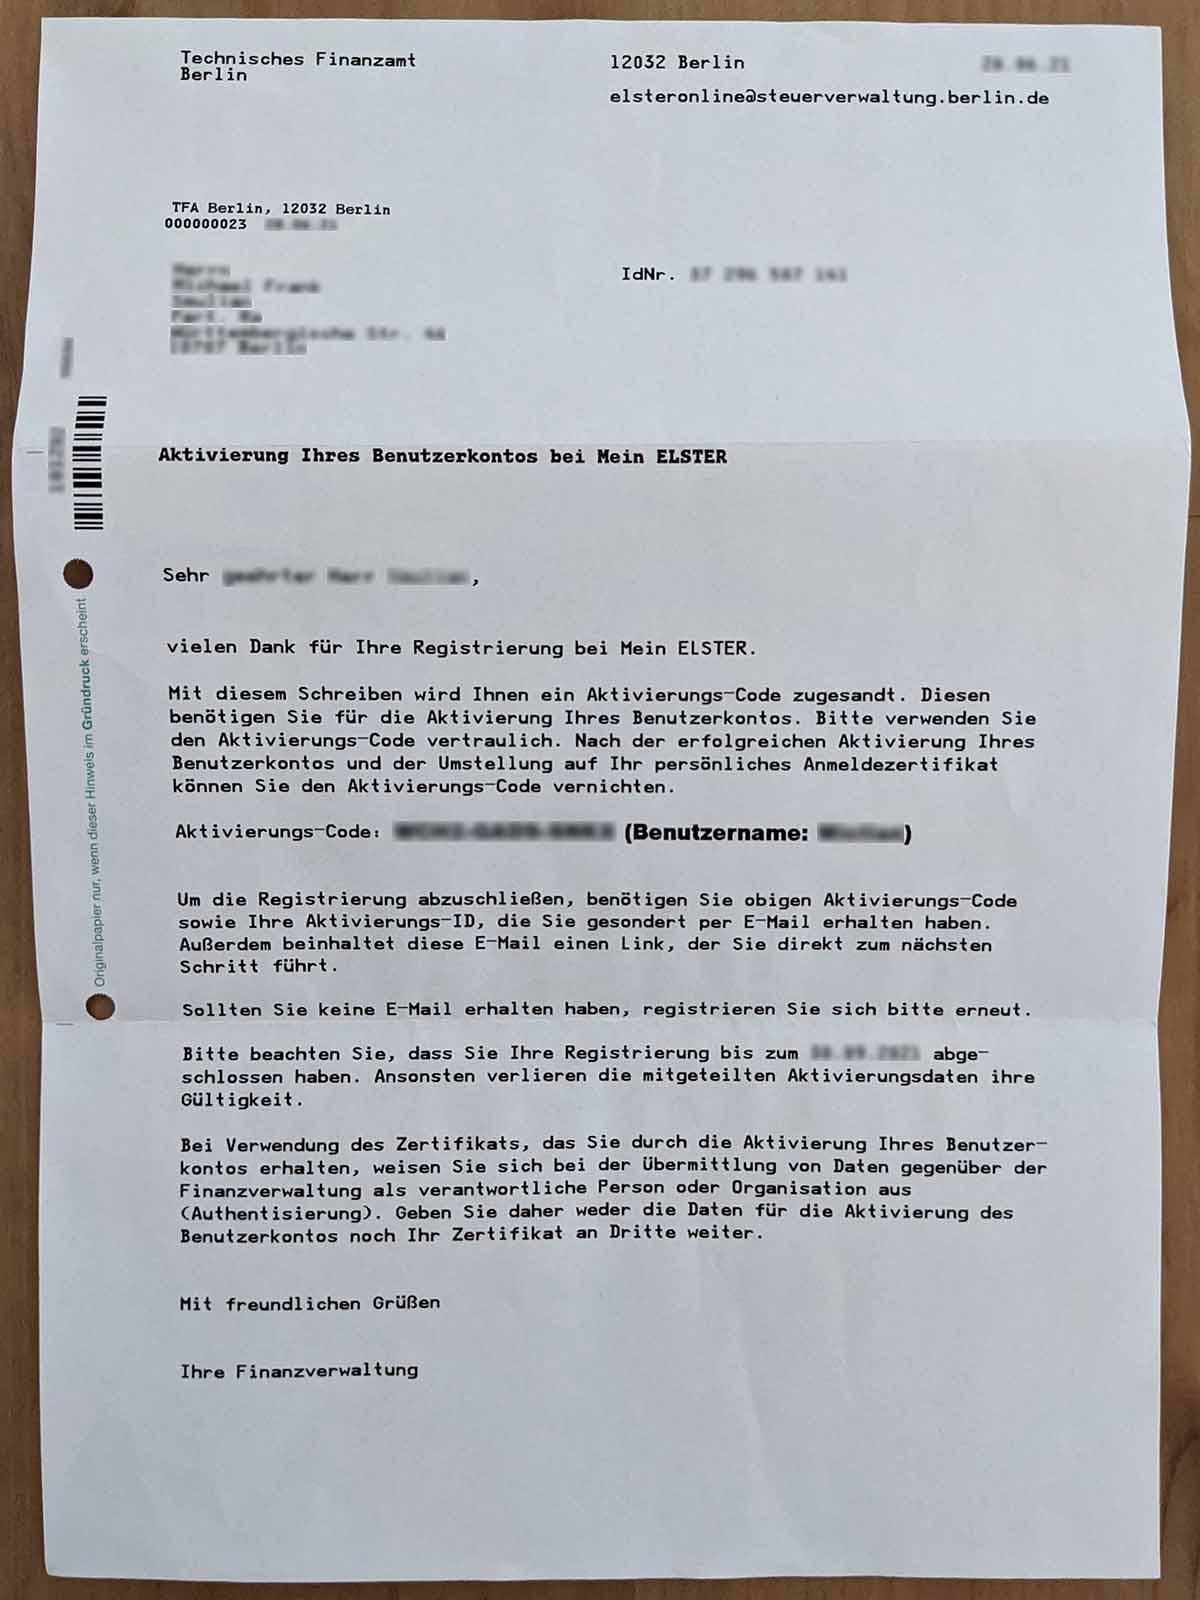
You will also received a second letter in the post along with the ‘Aktivierungs-Code’ (Activation Code). The second letter contains your ‘Abrufcode’ (Retrieval Code) which is used to increase security and is required each time you retrieve certificates. Make sure you keep your ‘Abrufcode’ (Retrieval Code) safe as you’ll need it each time you request German tax certificates on the ELSTER website.
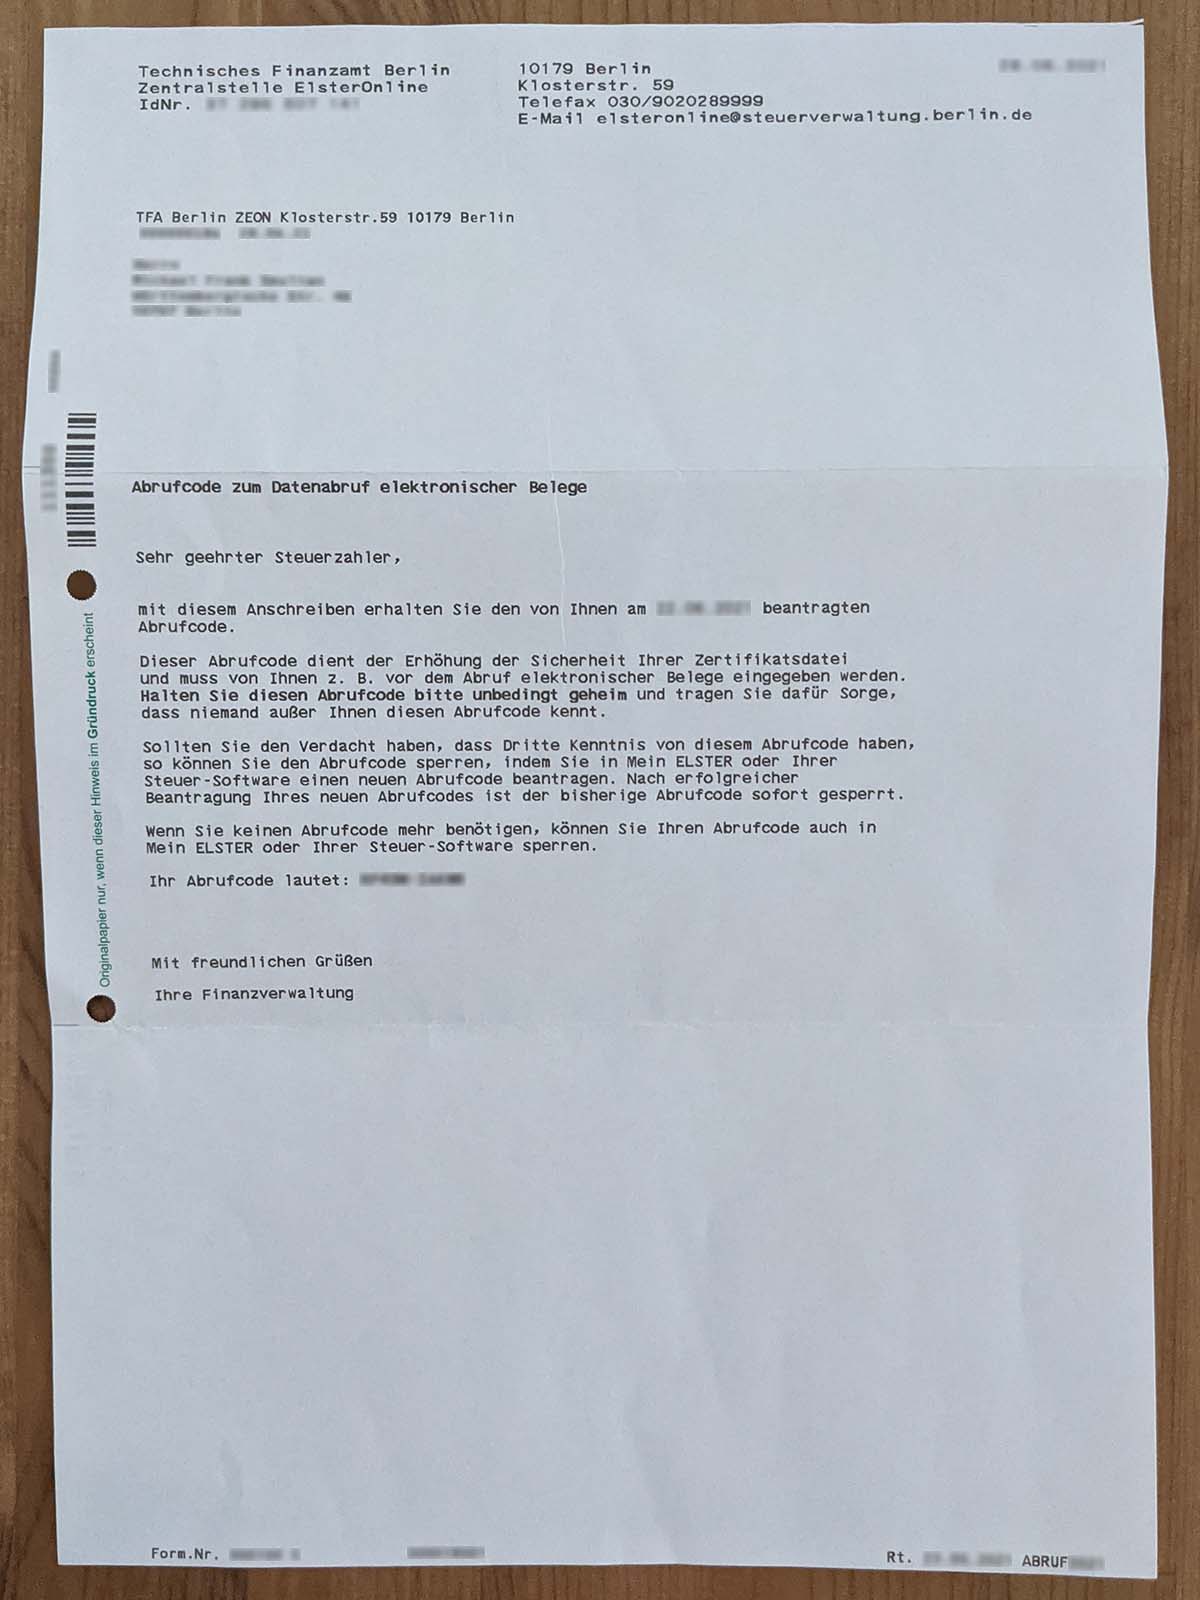
When you receive the ‘Aktivierungs-Code’ (Activation Code), you can easily complete your account registration on the ELSTER site. Simply click on the link that was sent to you via email (along with your Activation ID) or navigate to the ELSTER website to complete the registration.
Where to use the ‘Aktivierungs-Code’ (Activation Code) on the ELSTER Site
So to complete the registration, navigate to elster.de. Then click on ‘Mein Benutzerkonto’ (My User Account) where you will be directed to another page. Now simply click on ‘Benutzerkonto aktivieren’ (Activate User) and then immediately click on ‘Zertifikatsdatei (bei Identifikation mit steuerlicher Identifikationsnummer)’ [Link to the certificate file page (if identified with a tax identification number)] under the ‘Registrierung Für mich’ (Registration For me) section.
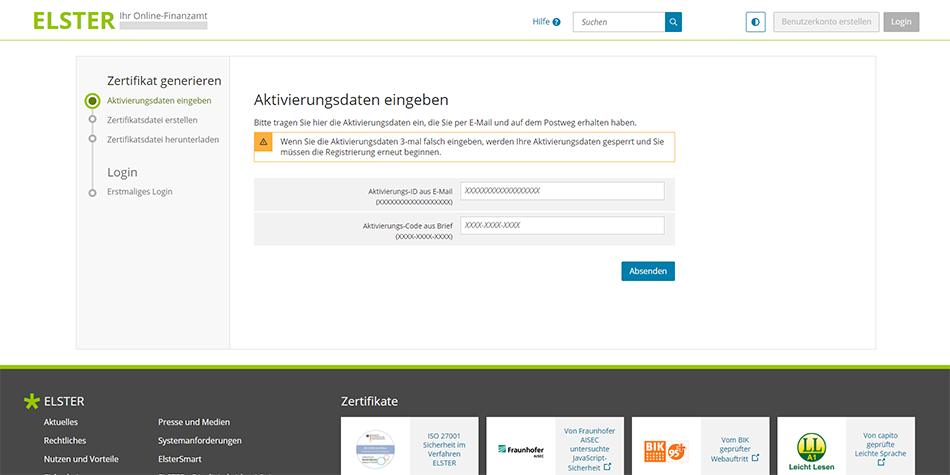
This will direct you to the ‘Aktivierungsdaten eingeben’ (Enter activation data) page where you will be able to complete the registration of your ELSTER account. You can also access this page by easily navigating to Aktivierungsdaten eingeben.
The ‘Aktivierungsdaten eingeben’ (Enter activation data) will prompt you to enter the ‘Aktivierungs-ID aus E-Mail’ (Activation ID you received via email) and the ‘Aktivierungs-Code aus Brief’ (Activation code you received via post). Click ‘Absenden’ to submit and continue to the next step.
How long is the ELSTER Activation Code valid for?
Don’t forget that the ‘Aktivierungs-Code’ (Activation Code) is only valid for 90 days. So make sure you complete your ELSTER account registration as soon as it arrives in the post.
Step 9: Create and Download Your Certificate File to Sign into ELSTER
You’re now one step closer to filing your first tax return in Germany. But before you can do that, you’ll need to download your certificate file in order to sign into your newly created Mein ELSTER account.
How to Create a Certificate File (Zertifikatsdatei) on ELSTER
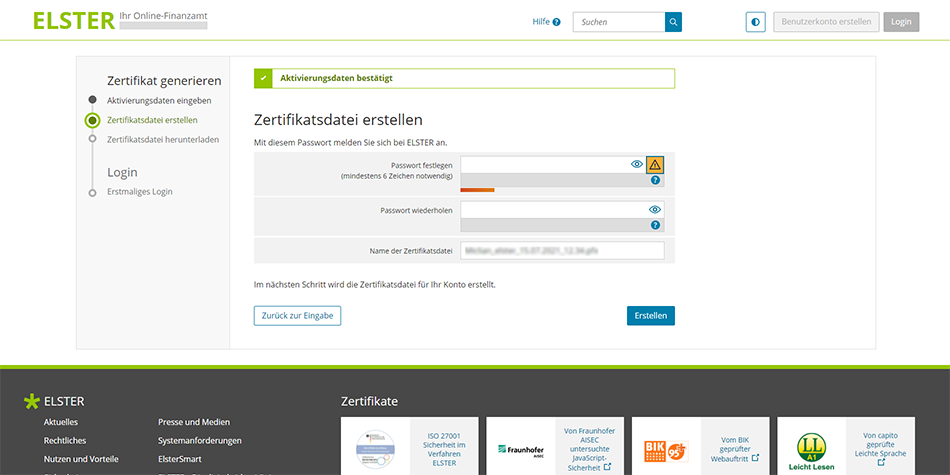
The ‘Zertifikatsdatei erstellen’ (Create a Certificate File) page will prompt you to create a secure password which you will use to log into Mein ELSTER. Simply type your password into the ‘Passwort festlegen’ (Set a new password) field and repeat the password in the ‘Passwort wiederholen’ (Repeat password) field.
You will also notice that the ‘Name der Zertifikatsdatei’ (Name of the Certificate File) will automatically be generated for you. After you’ve created your secure ELSTER login password, click ‘Erstellen’ (Create) to create a certificate file for your ELSTER account.
Bonus Tip: Your ELSTER login password must contain at least 6 characters. Make sure it contains numbers, letters (lower case and upper case) and special characters. This will help make sure your German income tax information always remains secure and only you can access it.
How to Download Your Certificate File (Zertifikatsdatei) on ELSTER
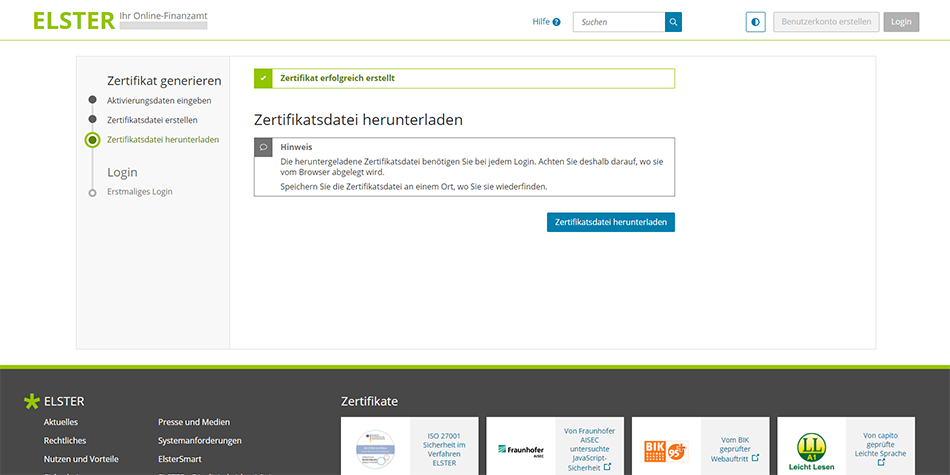
You’ll now be directed to the ‘Zertifikatsdatei herunterladen’ (Certificate File Download) page where you can download your certificate file. You’ll see a notice ‘Zertifikat erfolgreich erstellt’ which means your certificate was created successfully.
Remember, you will need your ‘Zertifikatsdatei’ (certificate file) every time you log onto Mein ELSTER to do your German taxes. So make sure you save the certificate file somewhere safe so you can refer back to it every time you want to log into your ELSTER account. Click on ‘Zertifikatsdatei herunterladen’ (Download certificate file) to download your certificate file.
Bonus Tip: You’ll need to use your ‘Zertifikatsdatei’ (certificate file) each time you want to sign into Mein ELSTER. So make sure you create a back-up by saving a copy on cloud services such as Google Drive and OneDrive. Saving your certificate file on the cloud also means you’ll be able to easily do your German taxes just about anywhere on the planet.
Step 10: Logging into Mein ELSTER for the First Time
Congratulations! You’ve now completed all the steps necessary to register and create your tax filing account on Mein ELSTER. You’re now ready to file your taxes in Germany online and for FREE.
So whether you registered as a freelancer, self-employed, employee or as a retired person, you’ll now be able to sign into ELSTER to submit your German tax return. Here’s what you can expect when you log into Mein ELSTER for the first time.
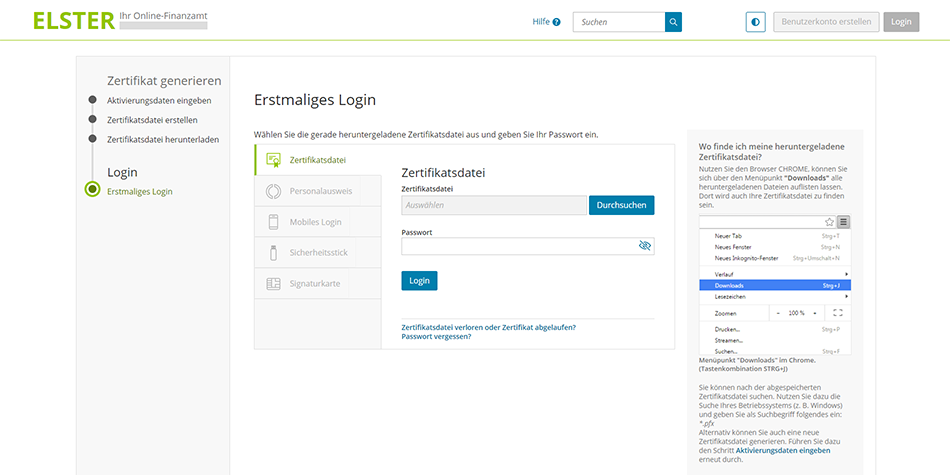
After you download the ‘Zertifikatsdatei’ (certificate file) in the previous step, you’ll be directed to the ‘Erstmaliges Login’ (First Login) page. On this page, you’ll be able to log into Mein ELSTER for the first time.
Simply click on ‘Durchsuchen’ (search) to search and select the certificate file you just downloaded, and then enter the ‘Passwort’ (password) you created two steps back. Then click Login to continue.
Check Your Personal Information Saved on Mein ELSTER
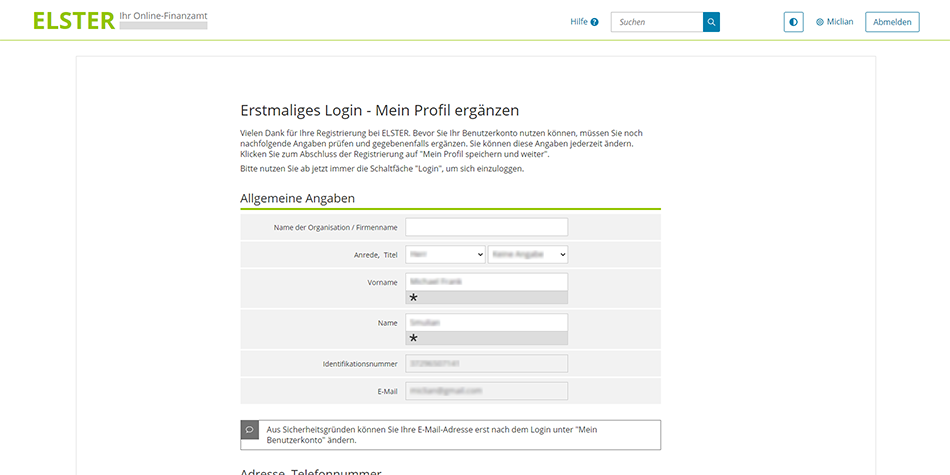
The ‘Erstmaliges Login – Mein Profil ergänzen’ (First login – complete my profile) page will appear and confirm that you have successfully registered with ELSTER. Before you can use your account, you must check your personal information and add if necessary.
Section 1: General Information (Allgemeine Angaben)
Your title, name and surname, German tax identification number and email address should already be filled in. If you selected Personal as your ELSTER Account Type in step 3, you’ll notice that the ‘Name der Organisation/Firmenname’ (Organization Name / Company Name) field is blank. This field is not compulsory, so you can leave it blank if it does not apply to you.
Section 2: Address and Phone Number (Adresse, Telefonnummer)
Your address should already be filled in. But you’ll noticed that the ‘Telefon (Vorwahl, Rufnummer)’ [Telephone (Area Code, Phone Number)] field is blank. Although it’s not compulsory to enter this information, you may add your telephone number if you wish.
Section 3: Tax Number (Steuernummer)
If you’re a freelancer or self-employed and you’ve received your tax number from your local ‘finanzamt’ (tax office), you can add your ‘Einkommensteuer Steuernummer’ (Income Tax Number). Simply click on ‘Land’ (State), and select the German Federal State you live in. Then input your German income tax number in the empty field.
Bonus Tip: If you’re filing your German tax return as a freelancer or you trade in your own name (sole trader), and you selected Personal as your ELSTER Account Type in step 3, this is where you insert your income tax number.
Just in case you’re wondering, there are 16 German Federal States (Deutschland Länder). Here’s the full list of the 16 federal states of Germany ( with the English translation in brackets):
| Deutschland Länder (German Federal States) |
|---|
| Baden-Württemberg (Baden-Wuerttemberg) |
| Bayern (Bavaria) |
| Berlin |
| Brandenburg |
| Bremen |
| Hamburg |
| Hessen (Hesse) |
| Mecklenburg-Vorpommern (Mecklenburg-Western Pomerania) |
| Niedersachsen (Lower Saxony) |
| Nordrhein-Westfalen (North Rhine-Westphalia) |
| Rheinland-Pfalz (Rhineland-Palatinate) |
| Saarland |
| Sachsen (Saxony) |
| Sachsen-Anhalt (Saxony-Anhalt) |
| Schleswig-Holstein |
| Thüringen (Thuringia) |
Section 4: Are you a tax advisor? (Sind Sie Steuerberater/in?)
Unless you’re a tax advisor and you have a ‘Kanzleiname’ (Firm Name), you can leave this section blank.
Once you’ve checked and added your information, simply click on ‘Mein Profil speichern und weiter’ (Save my profile and continue). And that’s it! You’re now literally one more step closer to getting started with your German taxes.
Step 11: Choose a German Tax Profile to Personalize Your ELSTER Account
There’s one final step you’ll need to complete before you can get started with your German taxes and file your first tax return online and for free. So hang in there, you’re almost home free!
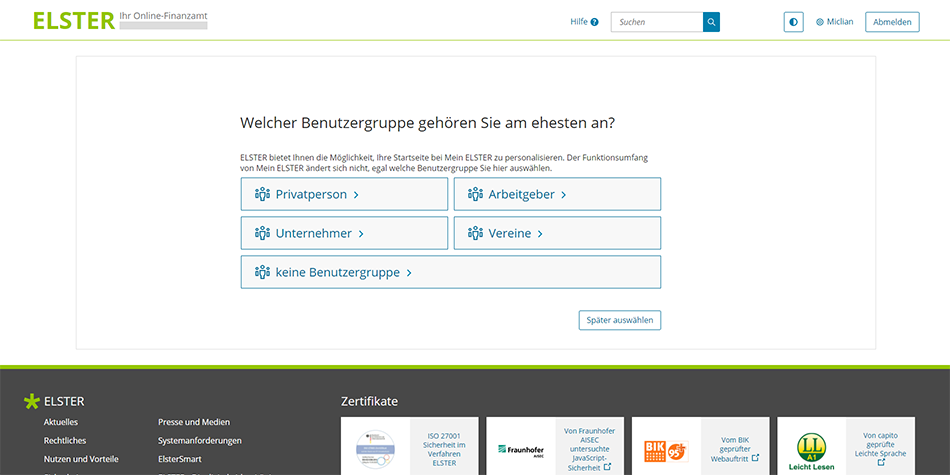
In the final step, you’ll be directed to the ‘Welcher Benutzergruppe gehören Sie am ehesten an?’ (Which user group are you most likely to belong to?) page. Here you can personalize your ELSTER profile home page by choosing the user group that applies to you.
By personalizing your profile home page, ELSTER makes it easier for you to submit your tax return in Germany by only showing you tax functionality that’s relevant for your user group. So we absolutely recommend you select your relevant user group, so you don’t see a bunch of options in home screen that don’t really apply to you.
The user group options are: ‘Privatperson’ (Private citizen), ‘Arbeitgeber’ (Employer), ‘Unternehmer’ (Entrepreneur), ‘Vereine’ (Societies) and ‘keine Benutzergruppe’ (no user group). You can also opt to do this step later by simply clicking on ‘Später auswählen’ (Select later).
Bonus Tip: If you’re a freelancer or you trade in your own name (sole trader), you may select ‘Unternehmer’ (Entrepreneur).
Read and Acknowledge the Data Protection Notice
After you select a user group, you’ll be directed to the ‘Datenschutzhinweis der Steuerverwaltung’ (Data protection notice of the tax administration) page. Like all German websites, it merely informs you that the ELSTER website is governed by Data Protection and provides you with a link to read more about it.
After you’ve read the information on Data Protection, simply tick the ‘Gelesen, nicht mehr anzeigen’ (Read, don’t show again) box and click on ‘Bestätigen und Weiter’ (Confirm and Continue). You will then be directed to your personal home page on the ELSTER website.
And that’s it! Congratulations! You’ve now successfully registered on ELSTER and you can now easily file your German tax return online and for FREE.
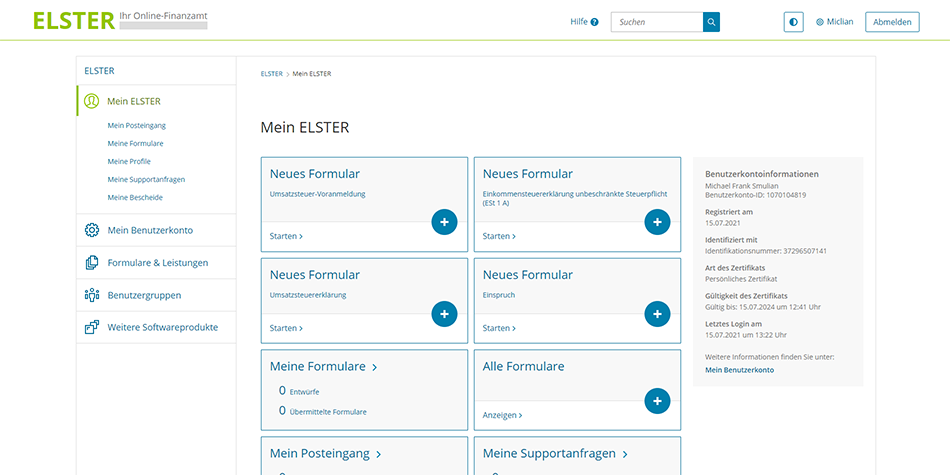
Remember to save and back-up your ELSTER certificate file after you download it. You’ll need the certificate file along with your password every time you login to your profile on the ELSTER website.
And next time you want to login to your ELSTER account, simply navigate to the Login page. Oh, and don’t forget to logout when you’re done.
How to avoid paying taxes in Germany?
Invest in crypto assets. That’s right! You won’t pay any taxes in Germany if you buy and hold crypto assets for at least one year. So any profit you make from the sale of crypto assets after investing in them for more than 12 months will be 100% tax free.
Luckily for you, eToro lets you invest in over 50 different crypto assets commission free. That’s 0% commission and no fees when you buy crypto assets on eToro. Open your free eToro account today and invest in crypto assets from as little as $10 (€9.50).
Your capital is at risk, other fees may apply. For more information, see the eToro disclaimer.
Filing Your First Tax Return in Germany
So now that you’ve discovered how to register on ELSTER, you can easily file your first German tax return online and for FREE. And whether you’re doing your taxes as a freelancer, self-employed, employee or even if you’re retired, now you’ll also be able to file all your future tax returns in Germany for free via the ELSTER platform.
Over the next few weeks, we’ll create a summary of the main forms you may need to complete on Mein ELSTER to successfully file your German tax return. So make sure you subscribe to be the first to know or keep an eye on this page for further updates.
Bonus Tip: Web browsers such as Google Chrome let you translate websites into any language in real time. If you’re doing your taxes in Germany for the first time, you can easily translate the ELSTER site to make it easier to file your German tax return online.


